Samples
The Sample Indexes is where you will be managing created Samples. Here you can filter, export, print QR-Codes and preform bulk actions on your data. There are currently two types of Samples within Culteva, namely Plant and Harvest Samples. Both Plant and Harvest Samples will be explained in this section as they are very similar apart from a few things that we will mention below.
Plant

Plant Sample icon on Culteva
A Plant Sample describes a group of plants or single entity within an evaluation process
Harvest

Harvest Sample icon on Culteva
A Harvest Sample describes a collection of fruit gathered during a single harvesting from a Plant Sample
Index
Here you will be managing you Samples. From this screen you will be able to do the following.
Sidebar Tabs
Filter

The filter sidebar for the Sample Index
From here there are a list of ways to filter on the Index to quickly and efficiently find the Samples you are looking for.
- Search
- Scion Cultivar
- Rootstock Cultivar
- Location
- Crop
- Group
- Licensee
- Planted Year / Week
- Row & Position
- Hide Destroyed Samples
Below in red you will be able to Clear all Filters
Export

The export sidebar for the Sample Index
You will be able to select the Samples that you wish to export. To select Samples click on the block located on the left side on the Sample rows. Once you have selected the Samples you will see that at the top on the toolbar Culteva will show how many Samples you have selected.
You can now click the EXPORT option. Once you have clicked the button an email will be sent to your address and it will contain a link that will start a download of the data you requested to export.

Example email when you export data from the Sample Index
Barcodes

The Barcode Tab on the Sample Index
On this tab you will be able to print out the labels you have selected on the Filter tab. We at provar use this feature and send these Qr-Codes to be laminated so we can leave them out in the field for easy access when evaluating with the built in QR-code scanner on the mobile application.
- Label Layout - Select the layout of the barcode
- Label Size - Choose how big you would like to have the Qr Code be
- Include Fields - Here you can select what data to display along with th QR-code
- Label Margin - Select the amount of Margin you would like to have between QR-codes on the page.
- Include White Space - This option add a white block for incase you would like to write on the labels yourself.
Bulk Actions

The Bulk Action tab on the Sample Index
From this tab you can have some overall control and make changes over multiple samples at once.
Starting from the top you will be able to change the following from selected Samples at once:
- Destroyed Date
- Planted Date / Harvested Date
- Label
- Size
- Description
- Row
- Position
- Row Spacing
- Plant Spacing
Next you will be able to change the selected Samples' Evaluations:
Create Evaluations - You will be able to create evaluations for multiple samples at once. (If they are going to be evaluated the same. Limited to on crop and protocol)
Set Evaluation End Date
Form
The create a new Sample click on the + button located on the bottom right of the Index page. Additionally you can click the … dropdown located at the top right of the screen and select the Add Sample option.
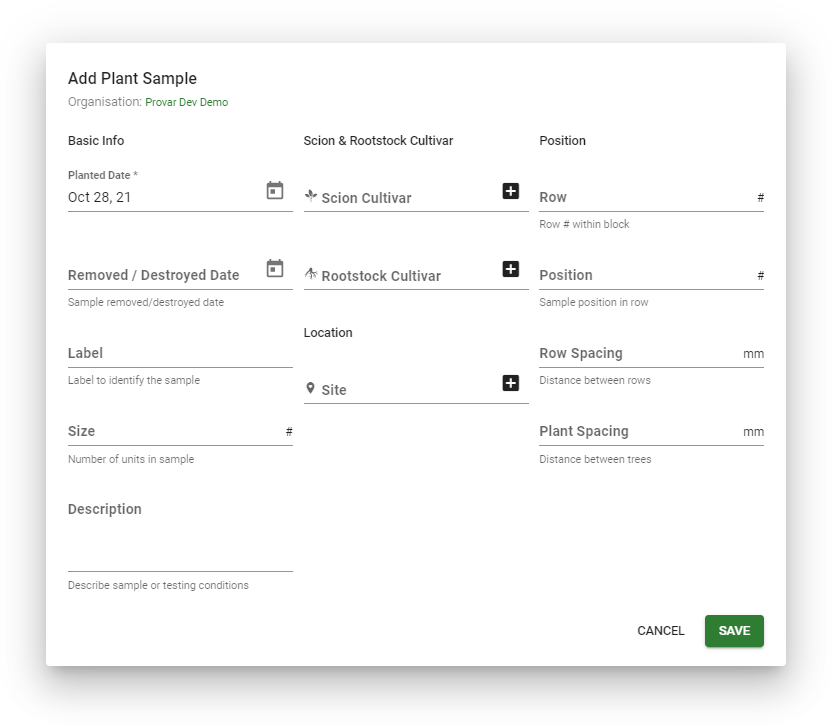
Plant Sample form when opened
Fields:
Basic Info
- Planted/Harvested Date
- The date that the Sample was planted / harvested
- Removed/Destroyed Date
- The date that the Sample no longer exists or has been uprooted
- Label
- The title you wish to identify the Sample by.
- Size
- The size is the amount of plants or fruit within the Sample.
- Description
- A brief description of the Sample and it's purpose.
Scion & Rootstock Cultivar
- Scion Cultivar/Cultivar
- Rootstock Cultivar/Cultivar
- Location
- The block in which the Plant Sample is located
Sample Origin

Plant Sample form when opened
- Connect Plant Sample
- You can connect a Plant Sample to a Harvest Sample in order to more easily navigate to the source of the Sample and vice versa.
You can either fill in specific data for the Harvest Sample or connect it to a Plant Sample by either searching through the list of Samples or creating a new Sample.
Position
- Row
- Position
- Row Spacing
- Plant Spacing
Once you have completed the form with the required information you can then save the Sample and it will be added to the Index.
Detail
Sample Detail can be viewed by clicking the clipboard icon next to the Sample you wish to view or by clicking the three dots dropdown next to the clipboard icon and selecting the View Sample Detail option.
Plant Sample Detail Example
The Sample Detail shows more information about the selected Sample. From Planted dates, a date timeline, Sample options as well as the ability to print out the page by clicking the top right printer icon.
There are a few differences between the two Samples. They are as follows:
Plant
Extract Harvest Sample
- Creates a new Harvest Sample connected to this Plant Sample
Phenological Timeline
- Shows relevant dates of the Plant Sample and displays it in a intractable timeline format
Extracted Harvest Samples
- This shows all the connected Harvest Samples and can be clicked on to go to that Sample's Detail
Harvest

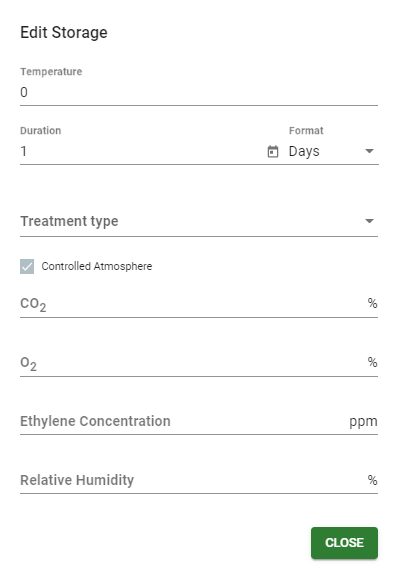
Storage Regime options
Storage Regime
- Users are able to setup their own Storage Regime's based on their needs
Schedule Storage Regime
- Users are able to select from our Industry standard Storage Regimes to apply to their Harvest Samples
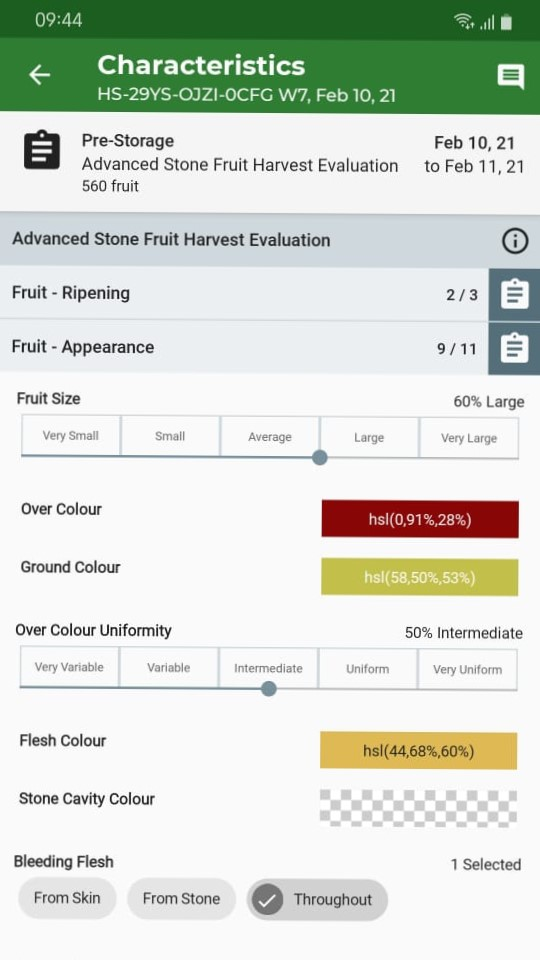
Characteristics Timeline
- The Harvest Sample's timeline shows CHaracteristic dates on their interactive timeline
Origin Plant Sample
- The origin of the Harvest Sample is shown and when click will take you to the detail page of the Plant Sample
Evaluations
To create a Evaluation you can click on the Add Evaluation Button at the bottom right of the screen under Evaluations or by clicking Add Evaluation on the the Sidebar Sample Options on the left side of the screen.
Once you have clicked the Add Evaluation button it will open up a form that you will need to fill out.

Evaluation form
The available fields are as follows:
Basic Info
- Evaluation Label
- Evaluation Start Date
- Evaluation End Date
- Sample Size
- Evaluation Protocol
Environmental
Storage Regime options
- Storage Regime
- Storage Schedule
Storage Regime conditions form
Once you have completed the form you can click the SAVE button and your Evaluation will be created.
You will now see you newly created Evaluation at the bottom of the Evaluation list.
On the right of the Evaluation you will see a row of icons. Their actions are as follows:
- Edit Notes
- Opens the notes of the Evaluation and allows you to view and add/edit Notes
- Edit Images
- Opens the Images of the Evaluation and allows you to upload, download and remove Images from the Evaluation
- Edit Measurements
- Opens the Measurements table and allows you to manage your collected data or fill it in manually on the Dashboard
- Edit Characteristics
- Opens the Characteristic Table and allows you to manage your collected data or fill additional dates and values in manually on the Dashboard
Additionally you can click teh three dots on the right side of the icons for more options. They are as follows:

Evaluation options dropdown
- Complete Evaluation
- Sets today's date as the end fate of the Evaluation
- Print Evaluation Form
- Opens up a new tab with the Protocol form for the Evaluation and allows you to use the built in printing functionality of the Browser as an additional option incase you still want to record data manually in the field.
- Delete Evaluation
- Removes the Evaluation from the Sample